
Setting Up the Computer
System environment requirements
The following system environment is required to use the printer driver.
Item | Specifications |
|---|---|
Operating system | 10.11, 10.12, 10.13, 10.14, 10.15 |
CPU | Intel Processor |
Memory | Memory capacity as recommended for your operating system |
Installing the printer driver
Install the printer driver using the installer.
Before installation, exit all application software programs that are running.
Insert the driver DVD into the DVD drive of the computer.
Open the folder that contains the target printer driver on the DVD.
Select the folder according to the printer driver, operating system, and language to be used.
Copy the driver file onto (XXX.pkg) on the desktop.
The driver folder varies depending on the required paper size. Select the file according to your environment.
To mainly use the metric-based paper size such as A4 size: "WW_A4" folder
To mainly use the inch-based paper size such as letter size or 8 1/2 11: "WW_Letter" folder
Double-click the file copied onto the desktop.
The printer driver installer starts.
Click [Continue] following the instructions on the pages that follow until the [Install] page appears.
When the name and password prompt appears during the procedure, enter the administrator name and password.
Click [Install].
By clicking [Customize], you can select whether to install the driver that has 2-sided printing specified as the default, or to install the driver that has 1-sided printing specified as the default. By default, the driver that has 2-sided printing specified as the default is installed. If both drivers are selected, two types of drivers are installed. The name of the driver that has 1-sided printing specified as the default is suffixed with an "(S)".
When the name and password prompt appears during the procedure, enter the administrator name and password.
The printer driver is installed on the computer.
Click [Close].
This completes the installation process of the printer driver. Then, add the printer to the computer.
Adding the printer
Add the printer automatically detected by Bonjour to the computer.
Select [System Preferences...] in the Apple menu.
Click the [Printers & Scanners] icon.
Click [+].
If a target printer name is found in the list displayed by clicking [+], select it. When a printer driver is selected automatically, the printer addition is completed. If a target printer name is not found, select [Add Other Printer or Scanner...] or [Add Printer or Scanner...], and proceed to step 4.
Click [Default].
Connected printers are detected.
If no printers are detected, restart this machine.
From the [Printer Name] list, select the desired printer for a Bonjour connection.
You can confirm the printer name in [Bonjour Setting] (Here) on this machine.
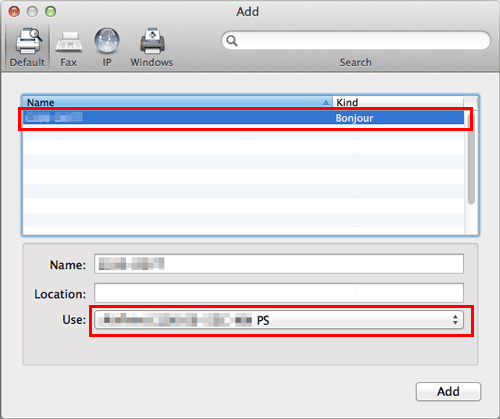
The printer driver for the selected printer is displayed in [Use:].
When the printer driver is displayed, go to Step 7.
When the printer driver is not correctly displayed, proceed to step 6.
Manually select the printer driver.
Select [Select Software...] from [Use:], then click the driver of the desired printer from the list that is displayed in another window.
Click [Add].
This completes the addition process of the printer. Then, proceed to the [Installable Options] window to configure the optional environment for this machine. For details, refer to Here.