
Specifying the Color and Image Quality
- Selecting colors for printing (Select Color:)
- Selecting the optimum color representation for the original (Image Quality Setting:)
- Making the image glossy (Glossy Mode)
- Preventing the generation of white space around images (Auto Trapping/Black Over Print:)
- Saving toner (Toner Save)
- Increasing the legibility of small or faint text (Edge Enhancement)
Selecting colors for printing ([Select Color:])
Select colors for printing. There are three color modes: [Auto Color] that fits the original color, [Full Color] and [Gray Scale].
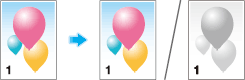
In [Select Color:] in [Quality], select a color mode for printing.

Selecting the optimum color representation for the original ([Image Quality Setting:])
Select the optimum settings for the original to print it at the optimum image quality level.
Select one of the following processes according to the original to be printed; the process suitable for originals consisting primarily of text, the process suitable for photos, the process suitable for originals created with DTP, or the process suitable for printing CAD data.

In [Image Quality Setting:] of [Quality], select the image setting mode to suit the original.

Making the image glossy ([Glossy Mode])
Images are printed with a glossy finish.
In [Quality], select the [Glossy Mode] check box.

This function is enabled when [Print Type:] is set to [1-Sided].
Preventing the generation of white space around images ([Auto Trapping]/[Black Over Print:])
The generation of white space on the boundary between different colors or around characters is prevented.
In [Quality], select the [Auto Trapping] check box or configure the [Black Over Print:] setting.
Select the [Auto Trapping] check box to superimpose neighboring colors to print so as to prevent generation of white space around a picture.
Configure the [Black Over Print:] setting to superimpose black color on a neighboring color to print so as to prevent generation of white space around black characters or figures. You can select whether to print black only around the characters or around both characters and figures.

Saving toner ([Toner Save])
Selecting the [Toner Save] check box in [Quality] adjusts the printing density in order to save the amount of toner consumed.
Increasing the legibility of small or faint text ([Edge Enhancement])
Sharpen the edges of images such as text in the table and graphics to improve legibility.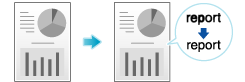
In [Edge Enhancement] of [Quality], select the level to highlight.