
Organize Files in a User Box
Basic file operations
You can check or delete files in a User Box as needed.
Purpose | Reference |
|---|---|
To delete a file | |
To rename a file | |
To register a file as an overlay image | |
To confirm file information |
To move a file to another User Box
Select a file, and tap [Move]; you can move the file to another User Box. The destination can be selected from a Public User Box, a Personal User Box, and a Group User Box. Select a destination User Box, and tap [Start].
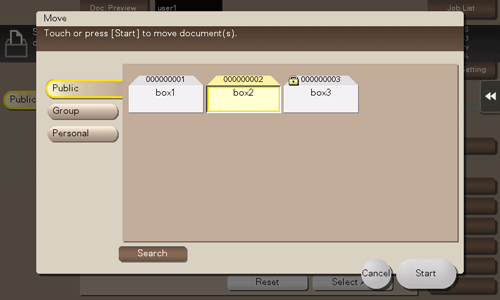

You do not need to enter the password even if it is specified for the destination User Box.
Copying a file to another User Box
Select a file, and tap [Copy]; you can copy the file to another User Box. The destination can be selected from the Public User Box, Personal User Box, and Group User Box. Select a User Box to copy a file to, and tap [Start].

You do not need to enter the password even if it is specified for the destination User Box.
Edit a page
Select a file, then tap [Other] - [Edit Document]. Now you can select page of the file to delete or rotate.
You can also long-tap the target file to display the menu icon, then drag and drop it to  to get the same result.
Select a page, and set the edit options.
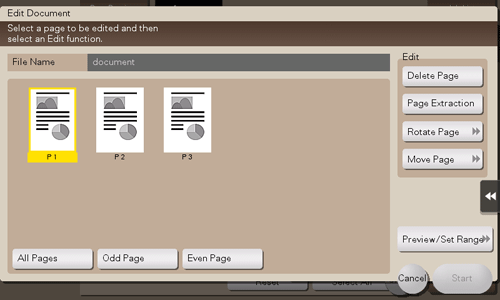
Function
Description
[Odd Page]
Selects odd-numbered pages only.
[Even Page]
Selects even-numbered pages only.
[All Pages]
Selects all pages.
[Delete Page]
Deletes a selected page or pages. For example, you can delete blank pages to reduce the amount of data.
You can also long-tap the target page to display the menu icon, then drag and drop it to
 to get the same result.
[Page Extraction]
Extracts a selected page. When there are too many pages to be deleted, selecting the page only you need to reserve eliminates the need for deleting after selecting many pages.
You can also long-tap the target page to display the menu icon, then drag and drop it to
 to get the same result.
[Rotate Page]
Rotates a selected page 90 degrees or 180 degrees.
When a 2-sided original is scanned, the top and bottom may be reversed page by page or the orientation may be different from the original. In this case, you can rotate and correct the orientation of each page.
You can also long-tap the selected page to display the menu icon, then drag and drop it to
 to get the same result.
[Move Page]
Reorders pages by moving some of them.
Only one page can be moved at a time. Repeat this operation to move two or more pages.
You can also drag and drop the target page to the desired place to sort pages.
[Preview/Specify by Input]: If a large number of pages are stored, use this option to set the destination to move pages by entering numeric values. Enter a destination page number, and specify to insert the page immediately before or after the destination.
[Preview/Set Range]
Sets a range of pages and displays them as preview image. You can also change the display size.
Tap [Start].
To save your changes, tap [Yes].
Your settings are saved.
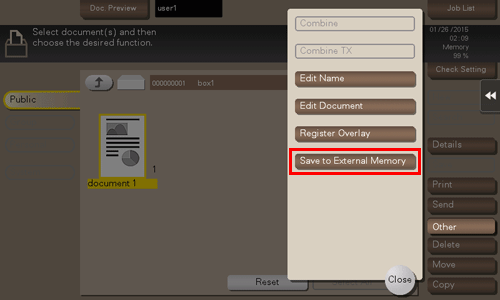
Saving a file in a USB flash drive
While a USB flash drive remains connected to the USB port of this machine, select a file, and tap [Other] - [Save to External Memory]. Now you can save the file on the USB flash drive.
In [USB flash drive function settings] (Here), permit saving a file in a USB flash drive.
For details on the conditions of the available USB flash drive, refer to Here.
Select a file to save in the USB flash drive, and tap [Other] - [Save to External Memory].
You can also long-tap the target file to display the menu icon, then drag and drop it to
 to get the same result.
Specify options to save a file as needed.
Options
Reference
Resolution
Color
File Type
Use the Start key to start saving.
When the operation is complete, remove the USB flash drive from the port of this machine.
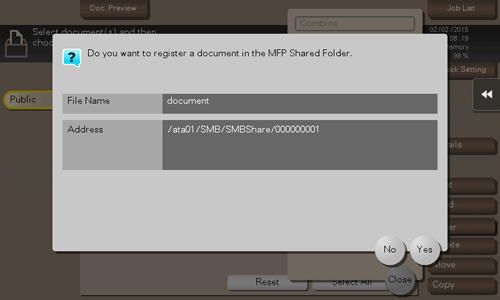
Re-registering a file in a User Box to the SMB folder
This function is available when files in the Public User Box are shared on the network using the Share SMB File function.
Select a file, and tap [Other] - [Save Document to MFP Shared Folder]. Now you can register the selected file in the SMB folder.
This function is available when you want to re-register a file deleted from the SMB folder in the SMB folder.

Sharing files in the User Box on the Network (Share SMB File)(Here)